-40%
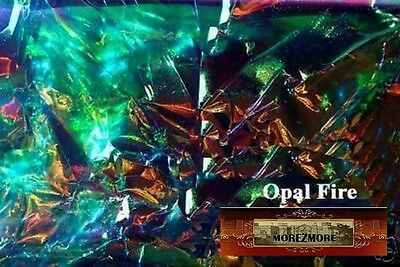
M00262-1 MOREZMORE Yard Angelina Fantasy Film OPAL FIRE BLUE Heat Bondable
$ 0.71
- Description
- Size Guide
Description
Northern wing of the estate.A stone-paved path leads to Morezmore Studio.
Inside you find:
a package of Angelina
Fusible Heat Bondable
Fantasy Film
for making wings and fins
for OOAK fairies, mermaids and babies
3 foot (94 cm) long
4" (10 cm) wide
Please scroll down if you would like to see how make OOAK wings out of Angelina film.
Please keep in mind that I, by all means, not an expert in wing-making, but this will give you a general idea on how to make something like this:
Example of making OOAK Fairy Wings:
Materials:
Angelina Film
Craft Wire
Ultimate Glue or your favorite glue
Sakura Crystal Lacquer
Tiny Iridescent Glass Bubbles
Forceps
Mini Craft Scissors
Detail Brushes
toothpicks
candle
1. Cut two pieces of wire (for two wings)
2. Make a loop and make a simple knot, then fold wire to form wing shape
3. You can keep it simple, twist the ends together and continue with glue, or you can cut and insert into the knot more pieces of wire, if you would like - that will make wings a little more interesting.
4. Weave wire in and out of the frame - that will make your frame stronger. With round nose jewelry pliers, make curly ques on the ends.
5. Thread another piece of wire through the knot - more weaving and curly ques.
These are frames with three pieces of wire added. Flatten the whole construction with flat nose pliers. Twist the ends together (that part will go into the back).
7. With a brush, carefully apply a thin layer of Ultimate glue on one side of the frame with a small brush or toothpick (if you want your curly ques stick out, don't put glue on them).
8. Carefully place the glue side on a piece of angelina film - try to work clean, try not to smudge glue all over the place. Gently press the frame with a toothpick so that all wire sticks to angelina film as much as possible. Let it dry for an hour or so.
9. Cut off the excess of the film - leave about 1/8 inch (3 mm) all around. When it is time to heat-shrink it, the film will shrink and hug the wire.
10. Put the wings into forceps, so you can hold them securely over the fire.
11. Get the candle out and light it. Put your hand above the fire - the correct distance is where you start to feel the heat, without burning your hand. Wave the wing above the fire, continuously moving - not quick moving, slow moving, you will see that the film starts to tighten around the wire, the colors start to change - first intensify, then explode! Keep in mind that there is about half a second between a really beautiful color spot and a hole.
If you do burn a hole, try to match it on a second wing. If you absolutely hate the hole, you can pull the film off the frame (with a bit of an effort) and glue another piece of film on the same frame.
12. Here are mine - holes and all - as I said, I am not an expert! I am sure you will do better than this :) By the way, the film is Mother of Pearl.
13. Next step - put wings flat and paint it thick with 3D Crystal Lacquer. let it dry thoroughly. Crystal Lacquer will further strengthen the construction and make a nice lacquer surface. When dry, turn them around and paint the other side with Crystal Lacquer as well. Let it dry.
14. The rest is a joy - decorate! Thin layer of Crystal lacquer - then - sprinkle glitter, add rhinestones, feathers. I used Aurora Borealis White Glitter and Tiny Iridescent Bubbles - all held with Crystal Lacquer.
Have fun!
*****************************
What to Expect While You Are Visiting Morezmore
Tracking Information for USA:
Included. I use USPS Online Shipping through Paypal (Click-and-Ship). When I create the shipping label, Ebay will send you an email with a link to the Delivery Confirmation and Tracking Information Number. Kindly note status updates takes about 24-48 hours to get updated.
Tracking Information for International Mail:
First class - included for some countries.
Priority mail - included for all countries.
International Buyers - Please Note:
Import duties, taxes, and charges are not included and are the buyer's responsibility.
Please check with your country's customs office to determine what these additional costs will be prior to bidding or buying.
Shipping:
24-48 hours, by United States Post Office (USPS).
USPS Expected Delivery Time
USA: First class - 3-5 days, Priority - 2-4 days
Canada: First class - 2-3 weeks, Priority 1-2 weeks
Europe and Australia: First class - 3-4 weeks, Priority - 2-3 weeks
Italy and Asia: First class or Priority - 4-8 weeks
Questions?
Your QUESTIONS are welcome! I am also a doll and puppet maker, I use most of the stuff we sell myself and will be glad to share what I learned.
Many thanks for shopping.
Natasha
The Morezmore Estate
